> ## Documentation Index
> Fetch the complete documentation index at: https://docs.multisynq.io/llms.txt
> Use this file to discover all available pages before exploring further.
# 3D Animation
> Learn to integrate Three.js with Multisynq for synchronized 3D experiences with interactive elements
This tutorial demonstrates how to integrate powerful third-party libraries like [Three.js](https://threejs.org/) with Multisynq for 3D rendering. You'll build a 3D bouncing ball simulation where balls bounce off invisible walls and an interactive central sphere that can be dragged and clicked.
## Try it out!
Scan or click the QR code to launch a new CodePen instance. Try clicking on or dragging the central sphere to see synchronized 3D interactions across all users!
This tutorial assumes you've completed the [Simple Animation tutorial](/tutorials/simple-animation) as it follows the same architectural pattern extended into 3D.
## Architecture Overview
The app follows the same Model-View pattern as Simple Animation:
* **Root MyModel**: Manages BallModel collection and central sphere state
* **Root MyView**: Creates BallView instances and handles Three.js integration
* **BallModel**: Calculates 3D positions and handles collisions
* **BallView**: Creates 3D visual objects and responds to position updates
## What You'll Learn
Import and initialize Three.js for 3D rendering
Convert 2D pointer events to 3D object interactions
Detect 3D object intersections from 2D clicks
Hook Three.js rendering into Multisynq's update cycle
## External Library Integration
### Import Methods
You can integrate Three.js using standard web development approaches:
```html HTML Script Tags theme={null}
```
```javascript ES6 Modules theme={null}
import * as THREE from 'three';
import 'pepjs'; // Pointer Events Polyfill
```
```javascript CommonJS theme={null}
const THREE = require('three');
require('pepjs');
```
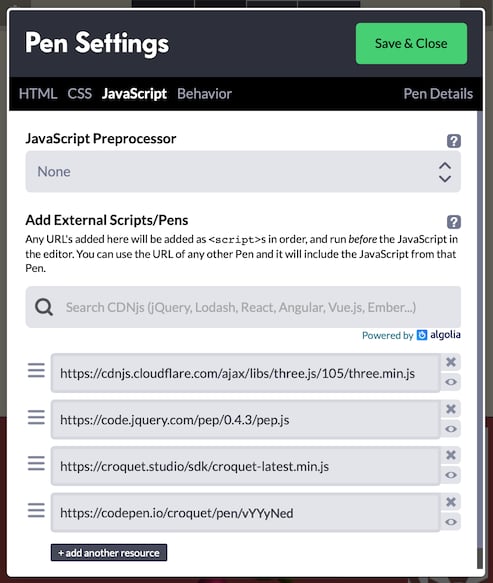
### CodePen Configuration
For CodePen projects, add external libraries in the JavaScript settings:
 ## Three.js Scene Initialization
### Basic Scene Setup
```javascript theme={null}
function setUpScene() {
// Create scene with lighting
const scene = new THREE.Scene();
scene.add(new THREE.AmbientLight(0xffffff, 0.5));
const light = new THREE.PointLight(0xffffff, 1);
light.position.set(50, 50, 50);
scene.add(light);
// Configure camera
const camera = new THREE.PerspectiveCamera(
75,
window.innerWidth / window.innerHeight,
0.1,
10000
);
camera.position.set(0, 0, 4);
// Set up renderer
const threeCanvas = document.getElementById("three");
const renderer = new THREE.WebGLRenderer({ canvas: threeCanvas });
renderer.setClearColor(0xaa4444); // Subdued red background
// ... event handlers setup ...
function sceneRender() {
renderer.render(scene, camera);
}
return { scene, sceneRender };
}
```
### Scene Components
Container for all 3D objects, lights, and cameras
Ambient light for overall illumination + point light for shadows
Perspective camera positioned to view the bouncing balls
WebGL renderer that draws the scene to a canvas element
## 3D Event Handling
### Pointer Event Processing
Convert 2D pointer events to 3D object interactions using raycasting:
```javascript theme={null}
function onPointerDown(event) {
event.preventDefault();
// Convert window coordinates to normalized device coordinates
setMouse(event); // (-1 to +1 on each axis)
// Cast ray from camera through mouse position
raycaster.setFromCamera(mouse, camera);
const intersects = raycaster.intersectObjects(scene.children);
// Find draggable objects
for (let i = 0; i < intersects.length && !dragObject; i++) {
const threeObj = intersects[i].object;
if (threeObj.q_draggable) {
dragObject = threeObj;
// ... initialize drag state ...
}
}
}
```
### Drag Movement with Throttling
```javascript theme={null}
function onPointerMove(event) {
event.preventDefault();
if (!dragObject) return;
// Throttle events to reduce network load
if (event.timeStamp - lastTime < THROTTLE_MS) return;
lastTime = event.timeStamp;
const lastMouse = {...mouse};
setMouse(event);
// Ignore micro-movements
if (Math.abs(mouse.x - lastMouse.x) < 0.01 &&
Math.abs(mouse.y - lastMouse.y) < 0.01) return;
// Calculate 3D position from 2D mouse movement
raycaster.setFromCamera(mouse, camera);
const dragPoint = raycaster.ray.intersectPlane(dragPlane, new THREE.Vector3());
dragObject.q_onDrag(new THREE.Vector3().addVectors(dragPoint, dragOffset));
dragged = true;
}
```
### Event Throttling Strategy
Limit events to 20 per second (50ms minimum interval)
Ignore movements smaller than 0.01 units
Reduces bandwidth usage without affecting user experience
Particularly important for mobile devices
### Click vs. Drag Detection
```javascript theme={null}
function onPointerUp(event) {
event.preventDefault();
if (dragObject) {
// If no dragging occurred, treat as click
if (!dragged && dragObject.q_onClick) {
dragObject.q_onClick();
}
dragObject = null;
dragged = false;
}
}
```
## Custom Event Handling
### Adding Custom Properties
Add custom properties to Three.js objects using `q_` prefix to avoid conflicts:
```javascript theme={null}
// In MyView initialization
this.centerSphere.q_onClick = () => this.publish(model.id, 'reset');
this.centerSphere.q_draggable = true;
this.centerSphere.q_onDrag = posVector => this.posFromSphereDrag(posVector.toArray());
```
### Click Event Handling
#### Reset Functionality
```javascript theme={null}
// In MyModel
this.subscribe(this.id, 'reset', this.resetCenterSphere);
resetCenterSphere() {
this.publish(this.id, 'recolor-center-sphere', this.neutralGrayColor);
}
```
```javascript theme={null}
// In BallModel
this.subscribe(this.sceneModel.id, 'reset', this.resetPosAndSpeed);
resetPosAndSpeed() {
this.position = {...this.sceneModel.centerSphere.position};
this.speed = this.randomSpeed();
// Position will be published on next step()
}
```
Models must handle events to ensure synchronization across all users. Even if a view could handle events directly, involving the model ensures all session instances receive the same events.
### Drag Event Handling
#### Position Processing
```javascript theme={null}
posFromSphereDrag(pos) {
const limit = Q.CONTAINER_SIZE / 2;
// Constrain x and y to container bounds
[0, 1].forEach(i => {
if (Math.abs(pos[i]) > limit) {
pos[i] = limit * Math.sign(pos[i]);
}
});
this.publish(this.sceneModel.id, 'sphere-drag', pos);
}
```
#### Data Serialization
Convert Three.js objects to plain JavaScript arrays before publishing as events. Multisynq doesn't know how to serialize external library objects like `THREE.Vector3`.
```javascript theme={null}
// Good: Convert to array
dragObject.q_onDrag = posVector => this.posFromSphereDrag(posVector.toArray());
// Bad: Try to serialize Vector3 directly
// dragObject.q_onDrag = posVector => this.publish('sphere-drag', posVector);
```
## Render Loop Integration
### Controlled Rendering
Instead of using `requestAnimationFrame` directly, integrate with Multisynq's update cycle:
```javascript theme={null}
function setUpScene() {
// ... scene setup ...
function sceneRender() {
renderer.render(scene, camera);
}
return { scene, sceneRender };
}
```
### MyView Integration
```javascript theme={null}
class MyView extends Multisynq.View {
init() {
const sceneSpec = setUpScene();
this.scene = sceneSpec.scene;
this.sceneRender = sceneSpec.sceneRender;
// ... create 3D objects ...
}
update(time) {
// Called automatically by Multisynq
this.sceneRender();
}
}
```
### Benefits of Controlled Rendering
Rendering happens at exact moments when state changes
Avoids unnecessary renders when nothing changes
Consistent rendering timing across all users
Seamless integration with Multisynq's lifecycle
## 3D Object Management
### Creating 3D Objects
```javascript theme={null}
// Create sphere geometry and material
const sphereGeometry = new THREE.SphereGeometry(Q.SPHERE_RADIUS, 32, 32);
const sphereMaterial = new THREE.MeshPhongMaterial({ color: 0x808080 });
this.centerSphere = new THREE.Mesh(sphereGeometry, sphereMaterial);
// Add to scene
this.scene.add(this.centerSphere);
// Make interactive
this.centerSphere.q_draggable = true;
this.centerSphere.q_onClick = () => this.publish(model.id, 'reset');
```
### Dynamic Object Updates
```javascript theme={null}
// Update position based on model state
updateSpherePosition(position) {
this.centerSphere.position.set(position[0], position[1], position[2]);
}
// Update color based on model state
updateSphereColor(color) {
this.centerSphere.material.color.setHex(color);
}
```
## Performance Considerations
### Optimization Techniques
Limit pointer events to 20 per second to reduce network load
Create geometry once and reuse for multiple objects
Only update 3D objects when model state actually changes
Use simpler geometry for distant objects
### Memory Management
```javascript theme={null}
// Dispose of geometry and materials when no longer needed
dispose() {
this.sphereGeometry.dispose();
this.sphereMaterial.dispose();
this.renderer.dispose();
}
```
## Advanced Integration Patterns
### Custom Object Properties
```javascript theme={null}
// Add metadata to Three.js objects
mesh.userData = {
multisynqId: model.id,
modelType: 'ball',
interactive: true
};
// Access in event handlers
if (intersectedObject.userData.interactive) {
// Handle interaction
}
```
### Multi-Library Integration
```javascript theme={null}
// Combine Three.js with physics engines
import * as CANNON from 'cannon-es';
// Create physics world
const world = new CANNON.World();
world.gravity.set(0, -9.82, 0);
// Sync Three.js visuals with physics simulation
updatePhysics() {
world.step(1/60);
this.ballMesh.position.copy(this.ballBody.position);
this.ballMesh.quaternion.copy(this.ballBody.quaternion);
}
```
## Troubleshooting
### Common Issues
Always convert Three.js objects to plain arrays before publishing
Use `q_` prefix for custom properties to avoid naming conflicts
Implement proper event throttling and geometry reuse
Ensure all state changes go through the Model layer
### Debug Tips
```javascript theme={null}
// Log raycasting results
console.log('Intersections:', raycaster.intersectObjects(scene.children));
// Visualize ray casting
const helper = new THREE.ArrowHelper(
raycaster.ray.direction,
raycaster.ray.origin,
100,
0xff0000
);
scene.add(helper);
```
## Next Steps
See 3D techniques in a complete multiplayer game
Learn advanced data management and sharing techniques
## Best Practices Summary
Use standard import methods and initialize in view constructor
Implement proper throttling and convert coordinates carefully
Keep 3D objects in sync with Multisynq model state
Optimize rendering, reuse geometry, and manage memory properly
This tutorial demonstrates how to create sophisticated 3D collaborative experiences by combining Multisynq's synchronization capabilities with Three.js's powerful 3D rendering. The same patterns can be applied to other 3D libraries and more complex applications.
## Three.js Scene Initialization
### Basic Scene Setup
```javascript theme={null}
function setUpScene() {
// Create scene with lighting
const scene = new THREE.Scene();
scene.add(new THREE.AmbientLight(0xffffff, 0.5));
const light = new THREE.PointLight(0xffffff, 1);
light.position.set(50, 50, 50);
scene.add(light);
// Configure camera
const camera = new THREE.PerspectiveCamera(
75,
window.innerWidth / window.innerHeight,
0.1,
10000
);
camera.position.set(0, 0, 4);
// Set up renderer
const threeCanvas = document.getElementById("three");
const renderer = new THREE.WebGLRenderer({ canvas: threeCanvas });
renderer.setClearColor(0xaa4444); // Subdued red background
// ... event handlers setup ...
function sceneRender() {
renderer.render(scene, camera);
}
return { scene, sceneRender };
}
```
### Scene Components
Container for all 3D objects, lights, and cameras
Ambient light for overall illumination + point light for shadows
Perspective camera positioned to view the bouncing balls
WebGL renderer that draws the scene to a canvas element
## 3D Event Handling
### Pointer Event Processing
Convert 2D pointer events to 3D object interactions using raycasting:
```javascript theme={null}
function onPointerDown(event) {
event.preventDefault();
// Convert window coordinates to normalized device coordinates
setMouse(event); // (-1 to +1 on each axis)
// Cast ray from camera through mouse position
raycaster.setFromCamera(mouse, camera);
const intersects = raycaster.intersectObjects(scene.children);
// Find draggable objects
for (let i = 0; i < intersects.length && !dragObject; i++) {
const threeObj = intersects[i].object;
if (threeObj.q_draggable) {
dragObject = threeObj;
// ... initialize drag state ...
}
}
}
```
### Drag Movement with Throttling
```javascript theme={null}
function onPointerMove(event) {
event.preventDefault();
if (!dragObject) return;
// Throttle events to reduce network load
if (event.timeStamp - lastTime < THROTTLE_MS) return;
lastTime = event.timeStamp;
const lastMouse = {...mouse};
setMouse(event);
// Ignore micro-movements
if (Math.abs(mouse.x - lastMouse.x) < 0.01 &&
Math.abs(mouse.y - lastMouse.y) < 0.01) return;
// Calculate 3D position from 2D mouse movement
raycaster.setFromCamera(mouse, camera);
const dragPoint = raycaster.ray.intersectPlane(dragPlane, new THREE.Vector3());
dragObject.q_onDrag(new THREE.Vector3().addVectors(dragPoint, dragOffset));
dragged = true;
}
```
### Event Throttling Strategy
Limit events to 20 per second (50ms minimum interval)
Ignore movements smaller than 0.01 units
Reduces bandwidth usage without affecting user experience
Particularly important for mobile devices
### Click vs. Drag Detection
```javascript theme={null}
function onPointerUp(event) {
event.preventDefault();
if (dragObject) {
// If no dragging occurred, treat as click
if (!dragged && dragObject.q_onClick) {
dragObject.q_onClick();
}
dragObject = null;
dragged = false;
}
}
```
## Custom Event Handling
### Adding Custom Properties
Add custom properties to Three.js objects using `q_` prefix to avoid conflicts:
```javascript theme={null}
// In MyView initialization
this.centerSphere.q_onClick = () => this.publish(model.id, 'reset');
this.centerSphere.q_draggable = true;
this.centerSphere.q_onDrag = posVector => this.posFromSphereDrag(posVector.toArray());
```
### Click Event Handling
#### Reset Functionality
```javascript theme={null}
// In MyModel
this.subscribe(this.id, 'reset', this.resetCenterSphere);
resetCenterSphere() {
this.publish(this.id, 'recolor-center-sphere', this.neutralGrayColor);
}
```
```javascript theme={null}
// In BallModel
this.subscribe(this.sceneModel.id, 'reset', this.resetPosAndSpeed);
resetPosAndSpeed() {
this.position = {...this.sceneModel.centerSphere.position};
this.speed = this.randomSpeed();
// Position will be published on next step()
}
```
Models must handle events to ensure synchronization across all users. Even if a view could handle events directly, involving the model ensures all session instances receive the same events.
### Drag Event Handling
#### Position Processing
```javascript theme={null}
posFromSphereDrag(pos) {
const limit = Q.CONTAINER_SIZE / 2;
// Constrain x and y to container bounds
[0, 1].forEach(i => {
if (Math.abs(pos[i]) > limit) {
pos[i] = limit * Math.sign(pos[i]);
}
});
this.publish(this.sceneModel.id, 'sphere-drag', pos);
}
```
#### Data Serialization
Convert Three.js objects to plain JavaScript arrays before publishing as events. Multisynq doesn't know how to serialize external library objects like `THREE.Vector3`.
```javascript theme={null}
// Good: Convert to array
dragObject.q_onDrag = posVector => this.posFromSphereDrag(posVector.toArray());
// Bad: Try to serialize Vector3 directly
// dragObject.q_onDrag = posVector => this.publish('sphere-drag', posVector);
```
## Render Loop Integration
### Controlled Rendering
Instead of using `requestAnimationFrame` directly, integrate with Multisynq's update cycle:
```javascript theme={null}
function setUpScene() {
// ... scene setup ...
function sceneRender() {
renderer.render(scene, camera);
}
return { scene, sceneRender };
}
```
### MyView Integration
```javascript theme={null}
class MyView extends Multisynq.View {
init() {
const sceneSpec = setUpScene();
this.scene = sceneSpec.scene;
this.sceneRender = sceneSpec.sceneRender;
// ... create 3D objects ...
}
update(time) {
// Called automatically by Multisynq
this.sceneRender();
}
}
```
### Benefits of Controlled Rendering
Rendering happens at exact moments when state changes
Avoids unnecessary renders when nothing changes
Consistent rendering timing across all users
Seamless integration with Multisynq's lifecycle
## 3D Object Management
### Creating 3D Objects
```javascript theme={null}
// Create sphere geometry and material
const sphereGeometry = new THREE.SphereGeometry(Q.SPHERE_RADIUS, 32, 32);
const sphereMaterial = new THREE.MeshPhongMaterial({ color: 0x808080 });
this.centerSphere = new THREE.Mesh(sphereGeometry, sphereMaterial);
// Add to scene
this.scene.add(this.centerSphere);
// Make interactive
this.centerSphere.q_draggable = true;
this.centerSphere.q_onClick = () => this.publish(model.id, 'reset');
```
### Dynamic Object Updates
```javascript theme={null}
// Update position based on model state
updateSpherePosition(position) {
this.centerSphere.position.set(position[0], position[1], position[2]);
}
// Update color based on model state
updateSphereColor(color) {
this.centerSphere.material.color.setHex(color);
}
```
## Performance Considerations
### Optimization Techniques
Limit pointer events to 20 per second to reduce network load
Create geometry once and reuse for multiple objects
Only update 3D objects when model state actually changes
Use simpler geometry for distant objects
### Memory Management
```javascript theme={null}
// Dispose of geometry and materials when no longer needed
dispose() {
this.sphereGeometry.dispose();
this.sphereMaterial.dispose();
this.renderer.dispose();
}
```
## Advanced Integration Patterns
### Custom Object Properties
```javascript theme={null}
// Add metadata to Three.js objects
mesh.userData = {
multisynqId: model.id,
modelType: 'ball',
interactive: true
};
// Access in event handlers
if (intersectedObject.userData.interactive) {
// Handle interaction
}
```
### Multi-Library Integration
```javascript theme={null}
// Combine Three.js with physics engines
import * as CANNON from 'cannon-es';
// Create physics world
const world = new CANNON.World();
world.gravity.set(0, -9.82, 0);
// Sync Three.js visuals with physics simulation
updatePhysics() {
world.step(1/60);
this.ballMesh.position.copy(this.ballBody.position);
this.ballMesh.quaternion.copy(this.ballBody.quaternion);
}
```
## Troubleshooting
### Common Issues
Always convert Three.js objects to plain arrays before publishing
Use `q_` prefix for custom properties to avoid naming conflicts
Implement proper event throttling and geometry reuse
Ensure all state changes go through the Model layer
### Debug Tips
```javascript theme={null}
// Log raycasting results
console.log('Intersections:', raycaster.intersectObjects(scene.children));
// Visualize ray casting
const helper = new THREE.ArrowHelper(
raycaster.ray.direction,
raycaster.ray.origin,
100,
0xff0000
);
scene.add(helper);
```
## Next Steps
See 3D techniques in a complete multiplayer game
Learn advanced data management and sharing techniques
## Best Practices Summary
Use standard import methods and initialize in view constructor
Implement proper throttling and convert coordinates carefully
Keep 3D objects in sync with Multisynq model state
Optimize rendering, reuse geometry, and manage memory properly
This tutorial demonstrates how to create sophisticated 3D collaborative experiences by combining Multisynq's synchronization capabilities with Three.js's powerful 3D rendering. The same patterns can be applied to other 3D libraries and more complex applications.